Inventory
Taking inventory, I counted more than 34 EC2 instances, 4 of which were sharing two RDS instances. The RDS instances ran PostgreSQL but constantly hit connection limits and had reached their read-write capacity, causing significant slowdowns when it mattered most. The EC2 instances were mostly running comparatively simple services such as node.js applications serving APIs or dynamic frontends that accessed those APIs.
Planning
After some planning, I decided to consolidate the services into a single EC2 instance, backed by Docker containers behind a HAProxy.
I’ve used this approach for other clients and on my own servers. Because it’s dead simple, troubleshooting and recovery are quick if things go sideways. The only unexpected downtime occurred when a HAProxy update drove CPU usage to 100%, making services unresponsive — but we applied a fix in minutes.
Consolidation
The consolidation was straightforward:
- Prepare Docker containers for each of the services
- Write a Docker Compose file to define the services and their dependencies
- Write a HAProxy configuration to route traffic to the appropriate services
- Deploy the Docker Compose file on the EC2 instance
At this point, we had both the new and old server running in parallel, which made migration real easy.
- I wrote scripts to automate the database dump for each host, and imported these to the new server.
- Once everything ran as expected, we scheduled a maintenance window, reduced DNS TTLs, and waited.
- At cutover, I ran the update scripts, verified the services, and switched DNS to the new server.
The migration was over within 15 minutes, and the services were back online.
Details
Technically, here’s what I like to do:
- I store all service configurations (including a
docker-compose.yml) in/srvand separate subdirectories (e.g.,/srv/app1/config,/srv/app1/data), which simplifies backup and restore. - I avoid Docker volumes by mounting data directories directly from the host (for example,
/srv/app1/db/postgres:/var/lib/postgresql/data), keeping all data under/srvand reducing complexity. - I use a Python script to loop through each HAProxy domain and generate a self-signed certificate initially; on subsequent runs, it calls a local Let’s Encrypt container to fetch staging certificates, then production ones if successful, placing them in the expected location. This runs via cron and handles renewals automatically.
While I know Docker containers and reverse proxies can automate SSL, this approach offers transparency and control.
Benefits
This brought us the following benefits:
- Reduced maintenance overhead: Updates, SSL certificates, and other maintenance tasks could now be done in a single place, rather than across many different instances.
- Improved resource utilization: Under heavy load, the instance hardly reaches 50% of its capacity and all services remain responsive.
- Better performance: The EC2 instance is backed by more powerful hardware and so services perform better overall. Additionally, the network overhead between the EC2 instances and RDS was gone, as the database is now running in a Docker container on the same instance.
- Easier backup and restore: It was now possible to backup the entire state, from application to related data, in a single step.
- Less downtime and faster deployments: We could build and test the Docker images locally, and then deploy them to production with a single command
Of course, this approach has its downsides:
- There’s a single point of failure: Previously issues with individual services could be isolated easily.
- This is less scalable: Previously, it was possible to scale individual services up or down; now the entire instance must be scaled.
Conclusion
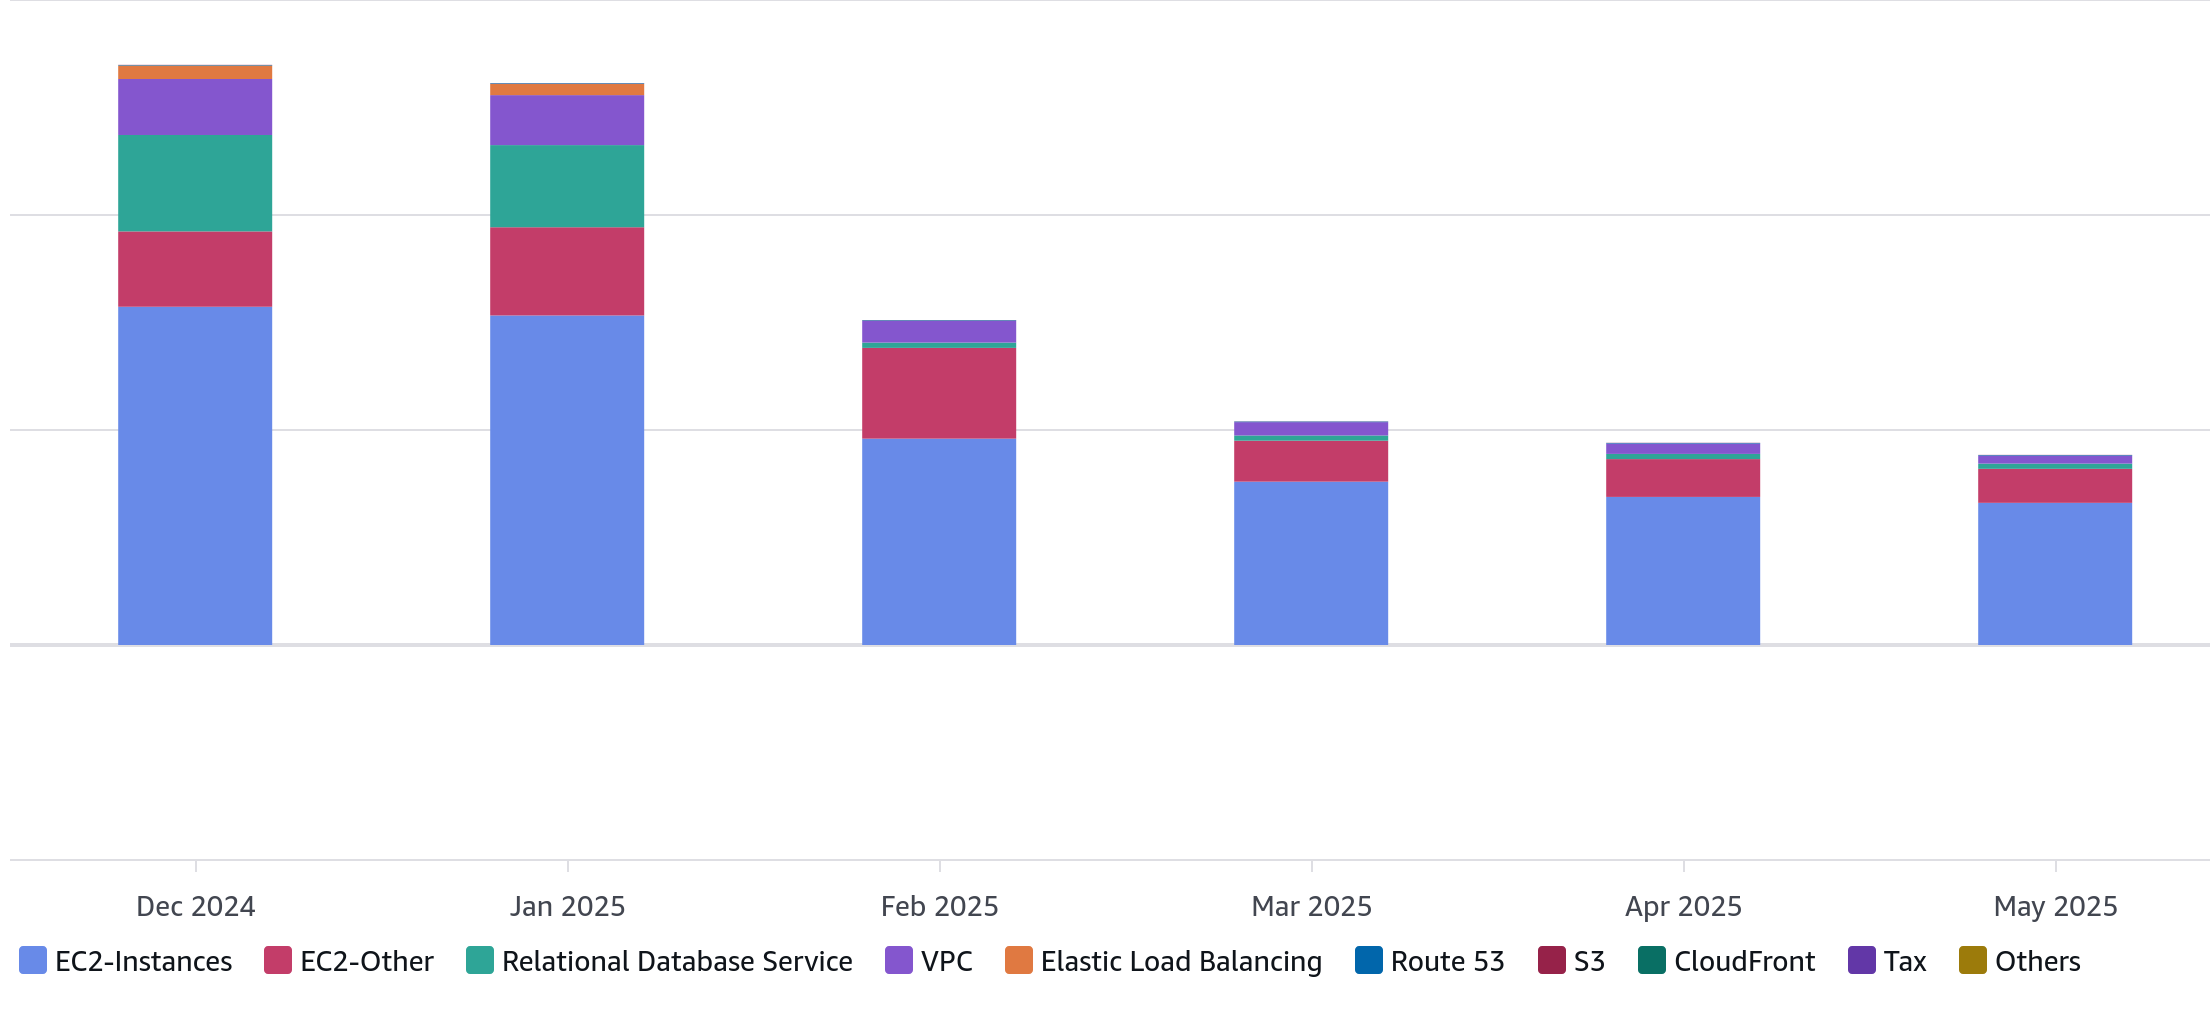
Overall, consolidation reduced AWS bills by 75% and removed a huge maintenance burden — the client is very happy with the results. The new setup is easier to maintain, more performant, and provides a better user experience for their customers.
]]>