# Mullvad Wireguard VPN on RUTX11
Source: https://gofranz.com/blog/mullvad-wireguard-vpn-on-rutx11/
You can pretty much follow the official guide here: https://mullvad.net/en/help/running-wireguard-router/. Below are some notes to complement the instructions.
### Get Configuration
Use either Web or Command line.
#### Web
When you generate the Wireguard configuration at https://mullvad.net/en/account/wireguard-config, make sure to select:
1. Server connection protocol: IPv4
2. Tunnel traffic: Only IPv4
If you want to use IPv6, you'll need to do NAT on the router, which is tricky. I've found it's easier to just leave it off until Mullvad provides a /64 IPv6 range, which would allow this to work, as designed.
The configuration looks like this:
```
[Interface]
# Device: Sacred Rhino
PrivateKey = SG5V4pwsGyerssT72iPPytXb0gDOVzyUdOCVOptfgW8=
Address = 10.68.223.115/32,fc00:bbbb:bbbb:bb01::5:df72/128
DNS = 10.64.0.1
[Peer]
PublicKey = C3jAgPirUUG6sNYe4VuAgDTYunENByG34X42y+SBngQ=
AllowedIPs = 0.0.0.0/0,::0/0
Endpoint = 193.32.127.69:51820
```
#### Command line
Login to your router with `root@...` and generate and show keys:
```bash
wg genkey | tee privatekey | wg pubkey > publickey
# show private key
cat privatekey
# show public key
cat publickey
```
Register your public key to obtain an IP for your client:
```bash
curl https://api.mullvad.net/wg/ -d account=YOURMULLVADACCOUNTNUMBER --data-urlencode pubkey=YOURPUBLICKEY
```
To get the VPN server (peer) public key and IP, refer to Mullvad [servers](https://mullvad.net/en/servers).
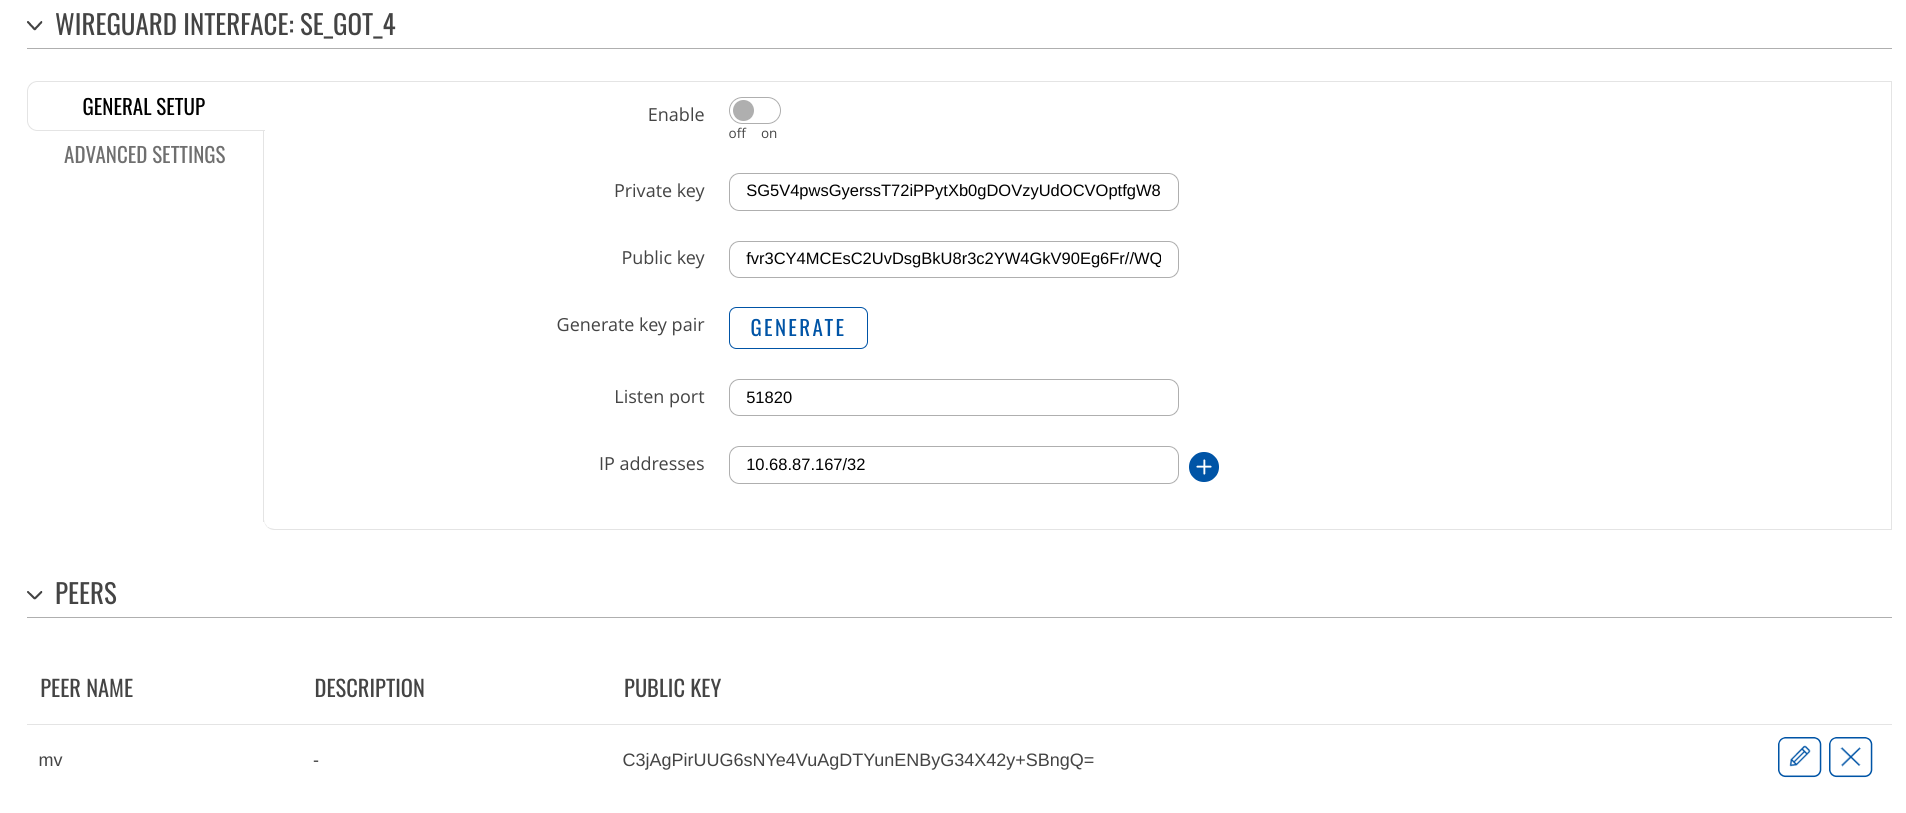
## Setup Wireguard VPN
_If you have a newer firmware than 07.05+, refer to the section below._
### Firmware older than ~07.05
- Copy the private key from the generated config (or command line)
- Copy the public key from the Mullvad web interface (or command line)
- Copy the public key for the peer, from the generated config (or [server](https://mullvad.net/en/servers))
- Copy the IP for the peer, from the generated config (or [server](https://mullvad.net/en/servers))
- Setup the peer with Allowed IP's `0.0.0.0/1` (instead of `0.0.0.0/0`)
- Set MTU of `1280`
- DNS Server `10.64.0.1`
 #### Firewall
Make sure to configue the zones (/network/firewall/zones) properly (ignore openvpn):
#### Firewall
Make sure to configue the zones (/network/firewall/zones) properly (ignore openvpn):
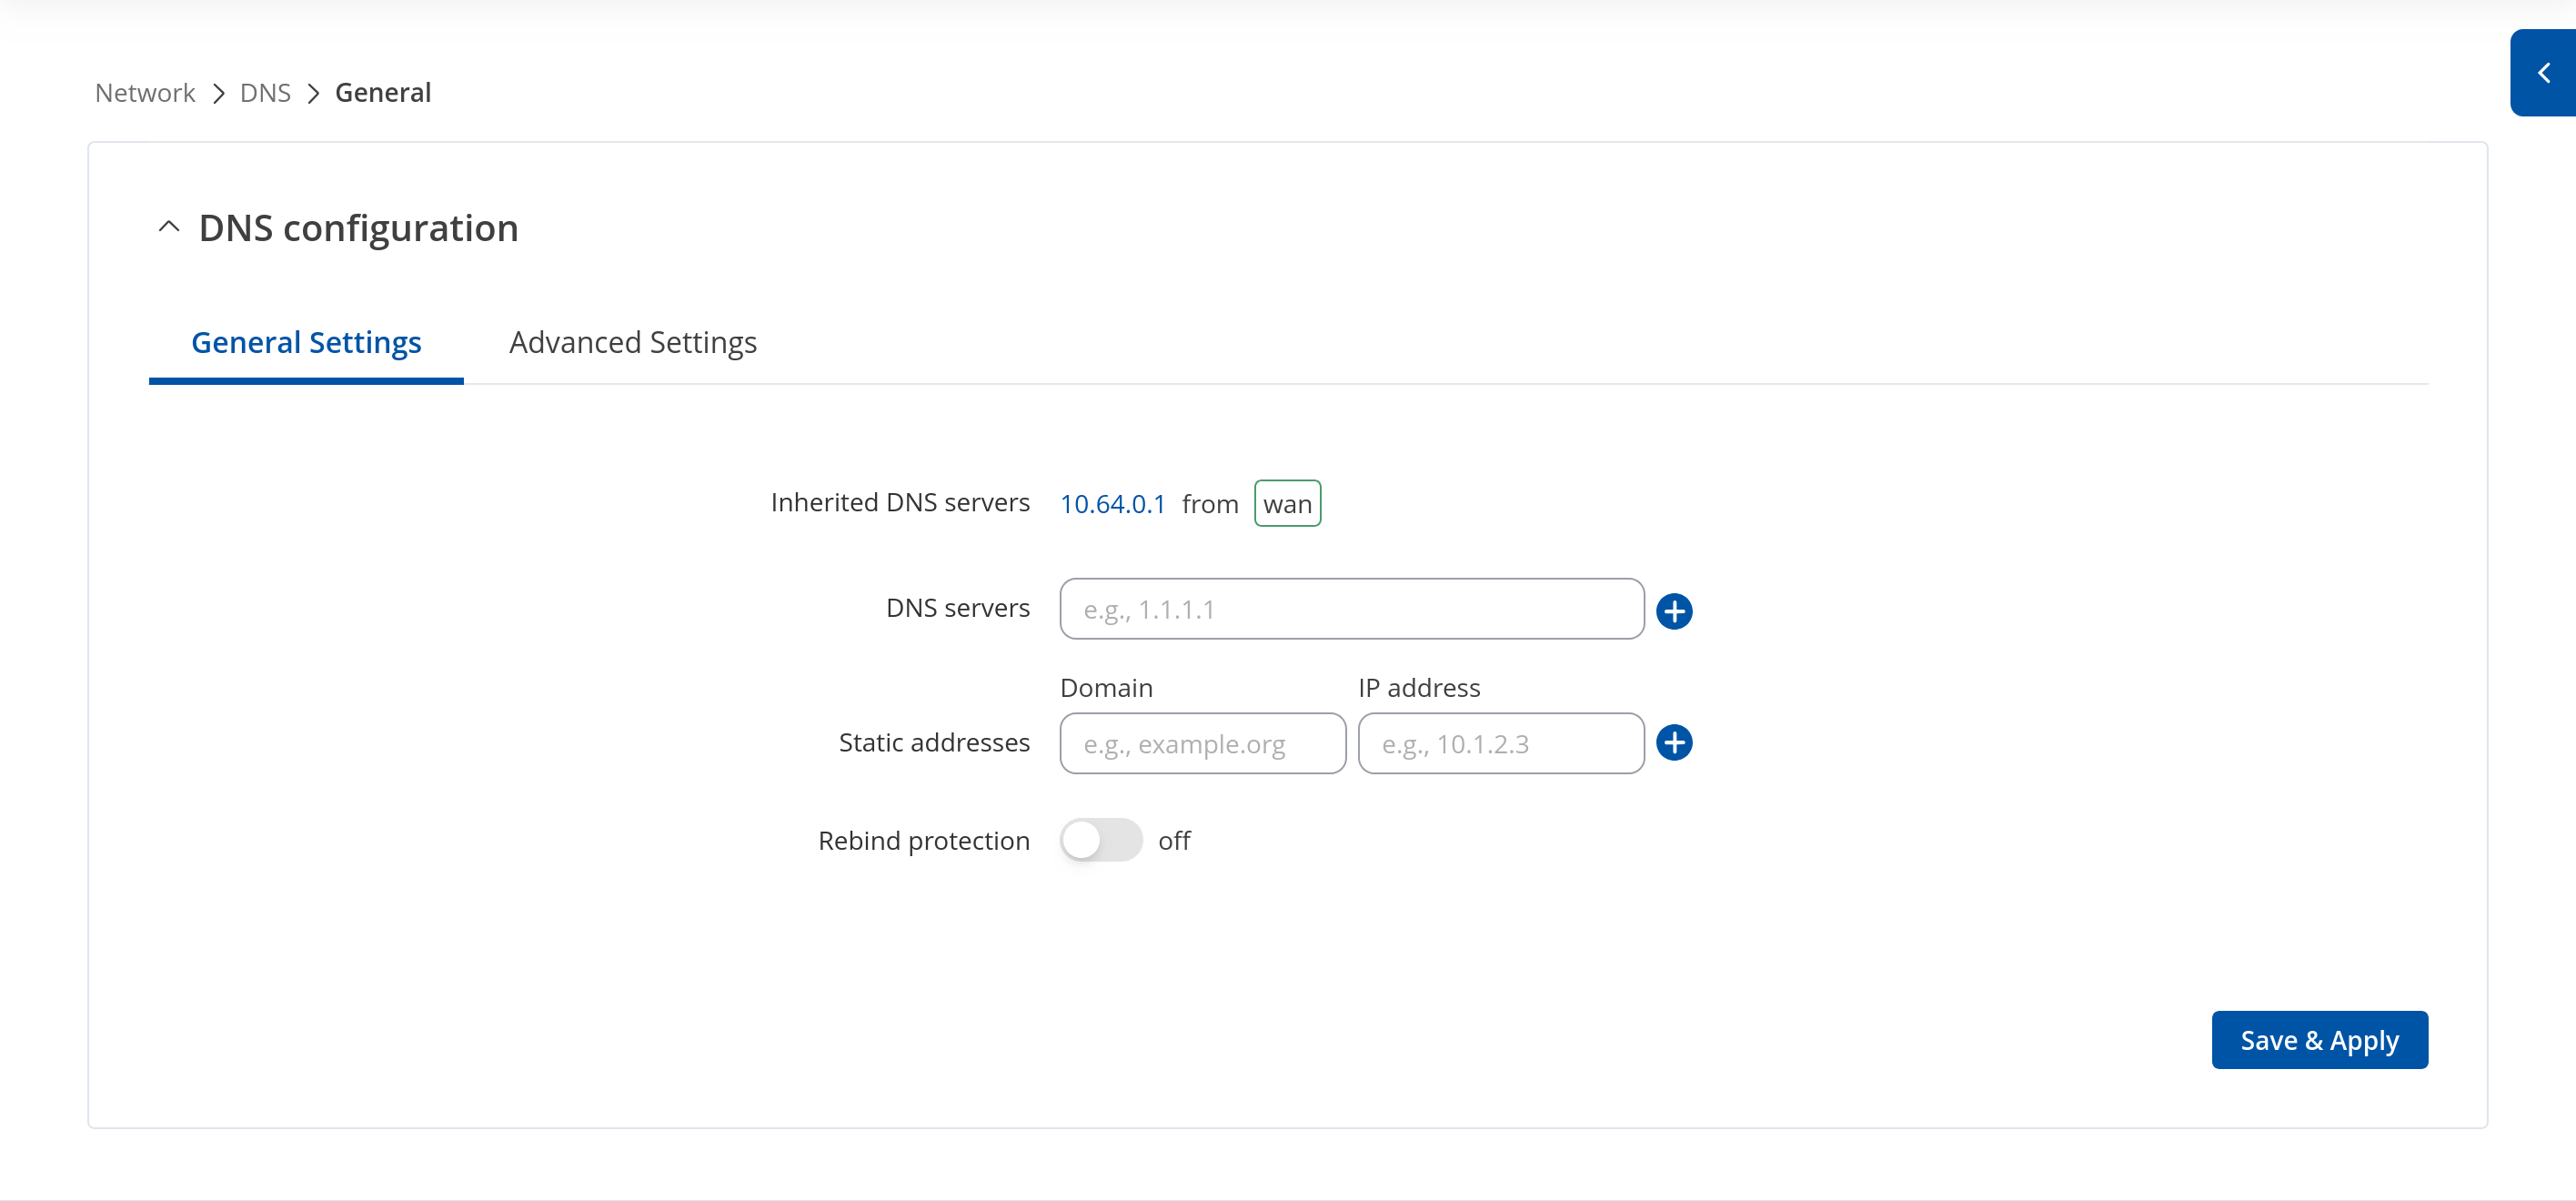
 #### DNS
The DNS (`10.64.0.1`) should be set in four places:
1. `/network/dns` (DNS forwardings)
2. `/network/interfaces/general` -> WAN (Use custom DNS servers)
3. `/network/interfaces/general` -> LAN (Use custom DNS servers)
4. `/services/vpn/wireguard` -> Wireguard Interface (DNS servers)
I'd suggest to double-check everything again and restart the router.
At this point you should have an active Wireguard connection that routes traffic from devices on your network trough Mullvad's VPN server. Do check that you're not leaking: https://mullvad.net/en/check or https://browserleaks.com/ip
Personally I went back to OpenVPN because even though Wireguard got me 5x the speed on the device (it's much more efficient than OpenVPN), the servers I tried were all blacklisted on many hosts so I was pretty much stuck on DuckDuckGo with many other sites giving me a connection error.
Using a proxy helped, but wouldn't work on all devices:
```bash
chromium --proxy-server="socks5://10.64.0.1:1080"
```
EDIT: Selecting another Wireguard server did wonders; All you need to do is update the peer public key and IP address.
### Firmware 07.05+
As of roughly `RUTX_R_00.07.05.4` this seems to do the trick:
- Copy the private key from the generated config (or command line)
- Copy the public key from the Mullvad web interface (or command line)
- Copy the public key for the peer, from the generated config (or [server](https://mullvad.net/en/servers))
- Copy the IP for the peer, from the generated config (or [server](https://mullvad.net/en/servers))
- Setup the peer with Allowed IP's `0.0.0.0/0`
- Set MTU of `1280`
- DNS Server `10.64.0.1`
#### Firewall
Make sure to configue the zones (/network/firewall/zones) properly (ignore openvpn):
#### DNS
The DNS (`10.64.0.1`) is set in two places:
1. `/network/wan#id=wan` -> WAN (Use custom DNS servers)
2. `/services/vpn/wireguard` -> Wireguard Interface (DNS servers)
As of roughly `RUTX_R_00.07.13.1`, you can confirm which DNS dnsmasq is using on `/network/dns/general`:
#### DNS
The DNS (`10.64.0.1`) should be set in four places:
1. `/network/dns` (DNS forwardings)
2. `/network/interfaces/general` -> WAN (Use custom DNS servers)
3. `/network/interfaces/general` -> LAN (Use custom DNS servers)
4. `/services/vpn/wireguard` -> Wireguard Interface (DNS servers)
I'd suggest to double-check everything again and restart the router.
At this point you should have an active Wireguard connection that routes traffic from devices on your network trough Mullvad's VPN server. Do check that you're not leaking: https://mullvad.net/en/check or https://browserleaks.com/ip
Personally I went back to OpenVPN because even though Wireguard got me 5x the speed on the device (it's much more efficient than OpenVPN), the servers I tried were all blacklisted on many hosts so I was pretty much stuck on DuckDuckGo with many other sites giving me a connection error.
Using a proxy helped, but wouldn't work on all devices:
```bash
chromium --proxy-server="socks5://10.64.0.1:1080"
```
EDIT: Selecting another Wireguard server did wonders; All you need to do is update the peer public key and IP address.
### Firmware 07.05+
As of roughly `RUTX_R_00.07.05.4` this seems to do the trick:
- Copy the private key from the generated config (or command line)
- Copy the public key from the Mullvad web interface (or command line)
- Copy the public key for the peer, from the generated config (or [server](https://mullvad.net/en/servers))
- Copy the IP for the peer, from the generated config (or [server](https://mullvad.net/en/servers))
- Setup the peer with Allowed IP's `0.0.0.0/0`
- Set MTU of `1280`
- DNS Server `10.64.0.1`
#### Firewall
Make sure to configue the zones (/network/firewall/zones) properly (ignore openvpn):
#### DNS
The DNS (`10.64.0.1`) is set in two places:
1. `/network/wan#id=wan` -> WAN (Use custom DNS servers)
2. `/services/vpn/wireguard` -> Wireguard Interface (DNS servers)
As of roughly `RUTX_R_00.07.13.1`, you can confirm which DNS dnsmasq is using on `/network/dns/general`:
 Do check that you're not leaking: https://mullvad.net/en/check or https://browserleaks.com/ip
### Other Notes
I have not configured IPV6 yet.
I'm not even sure it makes sense to use it, except to access ipv6-only services; It's designed to assign a unique IP to each device, which would defeat the purpose of the VPN in cases where your goal is to hide behind an IP used by thousands. That being said, it's still easy to identify you by a combination of what browser you're using, it's version, plugins, screen size, OS, .... even the way, you move your mouse. Check this out: https://browserleaks.com/canvas.
- In Network / LAN (/network/lan) -> DHCP Server -> IPV6: all disabled.
- In Network / WAN (/network/wan): `wan6` is disabled.
### Troubleshooting
Make sure your wireguard connection shows `latest handshake`:
```bash
$ wg show
interface: mv_se
public key: ...
private key: (hidden)
listening port: 51820
peer: C3jAgPirUUG6sNYe4VuAgDTYunENByG34X42y+SBngQ=
endpoint: 193.32.127.69:51820
allowed ips: 0.0.0.0/0
latest handshake: 1 minute, 51 seconds ago <-----------------------
transfer: 318.16 MiB received, 14.14 MiB sent
```
Route
```bash
$ ip -4 route show
default dev mv_se proto static scope link
default via 8*.1**.1**.1 dev eth1 proto static src 8*.1**.1**.115 metric 1
10.10.10.0/24 dev br-lan proto kernel scope link src 10.10.10.1
8*.1**.1**.0/24 dev eth1 proto static scope link metric 1
193.32.127.69 via 8*.1**.1**.1 dev eth1 metric 1
```
Route
```bash
$ route -n
Kernel IP routing table
Destination Gateway Genmask Flags Metric Ref Use Iface
0.0.0.0 0.0.0.0 0.0.0.0 U 0 0 0 mv_se
0.0.0.0 8*.1**.1**.1 0.0.0.0 UG 1 0 0 eth1
10.10.10.0 0.0.0.0 255.255.255.0 U 0 0 0 br-lan
8*.1**.1**.0 0.0.0.0 255.255.255.0 U 1 0 0 eth1
193.32.127.69 8*.1**.1**.1 255.255.255.255 UGH 1 0 0 eth1
```
**Update: 2025-03-07**
Updated the guide to reflect the changes in the latest firmware.
Do check that you're not leaking: https://mullvad.net/en/check or https://browserleaks.com/ip
### Other Notes
I have not configured IPV6 yet.
I'm not even sure it makes sense to use it, except to access ipv6-only services; It's designed to assign a unique IP to each device, which would defeat the purpose of the VPN in cases where your goal is to hide behind an IP used by thousands. That being said, it's still easy to identify you by a combination of what browser you're using, it's version, plugins, screen size, OS, .... even the way, you move your mouse. Check this out: https://browserleaks.com/canvas.
- In Network / LAN (/network/lan) -> DHCP Server -> IPV6: all disabled.
- In Network / WAN (/network/wan): `wan6` is disabled.
### Troubleshooting
Make sure your wireguard connection shows `latest handshake`:
```bash
$ wg show
interface: mv_se
public key: ...
private key: (hidden)
listening port: 51820
peer: C3jAgPirUUG6sNYe4VuAgDTYunENByG34X42y+SBngQ=
endpoint: 193.32.127.69:51820
allowed ips: 0.0.0.0/0
latest handshake: 1 minute, 51 seconds ago <-----------------------
transfer: 318.16 MiB received, 14.14 MiB sent
```
Route
```bash
$ ip -4 route show
default dev mv_se proto static scope link
default via 8*.1**.1**.1 dev eth1 proto static src 8*.1**.1**.115 metric 1
10.10.10.0/24 dev br-lan proto kernel scope link src 10.10.10.1
8*.1**.1**.0/24 dev eth1 proto static scope link metric 1
193.32.127.69 via 8*.1**.1**.1 dev eth1 metric 1
```
Route
```bash
$ route -n
Kernel IP routing table
Destination Gateway Genmask Flags Metric Ref Use Iface
0.0.0.0 0.0.0.0 0.0.0.0 U 0 0 0 mv_se
0.0.0.0 8*.1**.1**.1 0.0.0.0 UG 1 0 0 eth1
10.10.10.0 0.0.0.0 255.255.255.0 U 0 0 0 br-lan
8*.1**.1**.0 0.0.0.0 255.255.255.0 U 1 0 0 eth1
193.32.127.69 8*.1**.1**.1 255.255.255.255 UGH 1 0 0 eth1
```
**Update: 2025-03-07**
Updated the guide to reflect the changes in the latest firmware.